How to make your own sensory bottle30 January 2024 | Isabella Martins 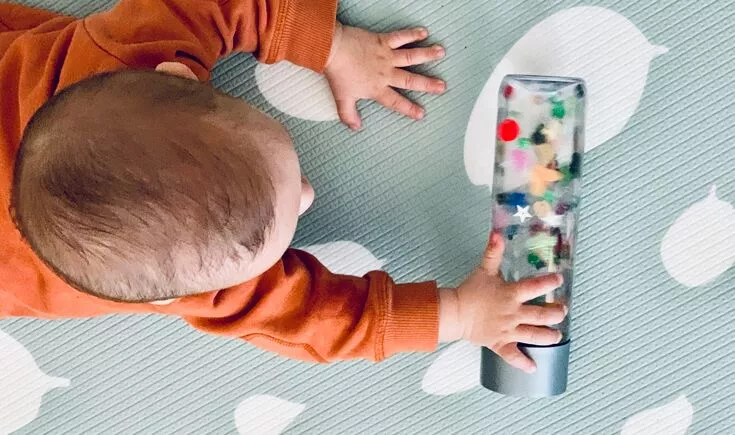
Parents and teachers are always looking for creative and engaging activities to do with young children, and at times that is not an easy task. One activity that is becoming popular is to make your own sensory bottle – they are easy to do, and they are not only fun but also have numerous benefits for young children. What are sensory bottles? The concept of sensory bottles is really simple: transparent containers filled with diverse materials that create a visual, auditory and tactile experience for children. The bottles come in different shapes and sizes, and its content vary from water and glitter, to oils, beads, rice or sand. Benefits of sensory bottles Calming effect As children explore the sensory box and observe its content to move, the bottles ca help reduce anxiety and promote a soothing effect, making a great tool for relaxation. Focus and concentration When children observe the content swirling and settling, it helps them to pay attention and focus on one task at a time, promoting mindfulness. Language development When playing with a sensory bottle, you can encourage children to describe what they see, hear and feel, ask them about colours, shapes and movements, this will improve their vocabulary and communication skills. Motor skills Handling and manipulating the bottle exercises the muscles of the arms and hands, developing their gross motor coordination. Turning, shaking, grasping the bottle will contribute to refine essential motor skills. How to make your own sensory bottle 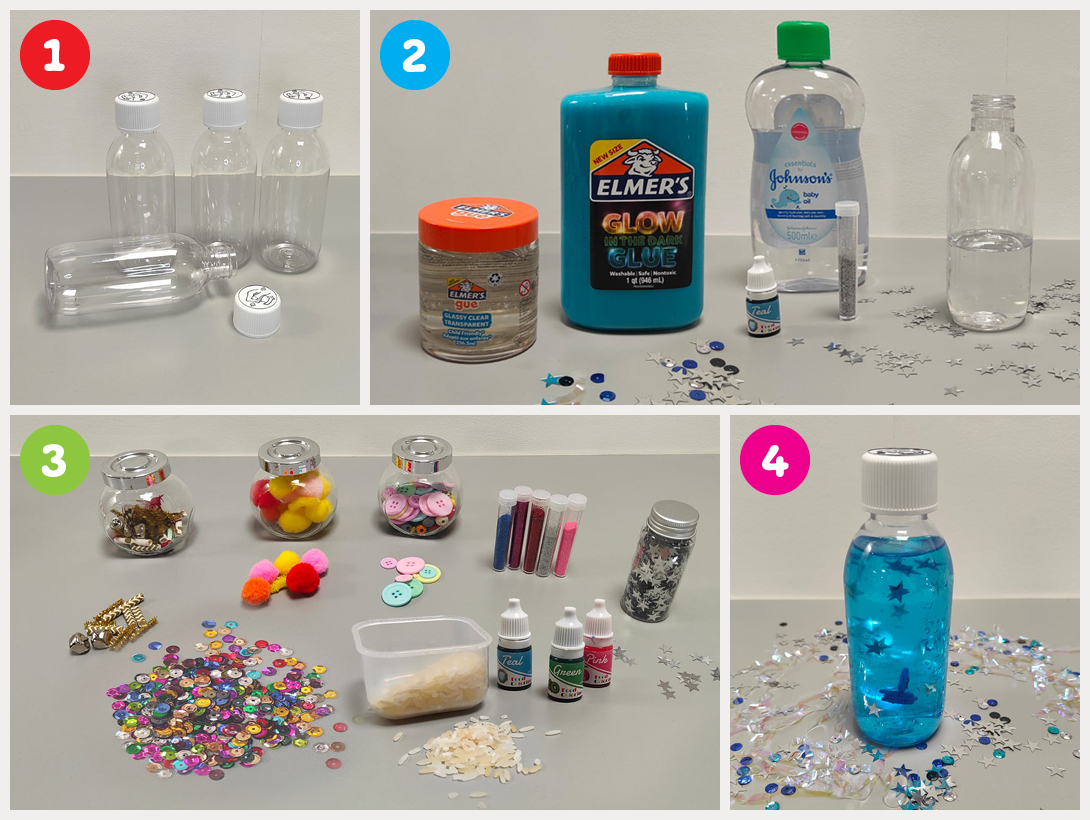
Creating your own sensory bottle is a simple DIY project that can be customised according to your child’s preferences or which of their senses you want to stimulate. 1. Select your bottle You will need a transparent bottle with a secure lid. 2. Choose your liquid ingredients You can use water, cooking oil, baby oil, handwash or shampoo. To make it more interesting you can add glitter or colouring component (such as food colouring and watercolour, for water-based liquids or oil dye for oil based liquids). Pro tip: add clear glue or glycerine to slow down the movement inside the bottle, this will create a mesmerising slow-motion effect 3. Add objects and dry ingredients Let your imagination flow, have a look on your utility and you can find great objects for your sensory bottle - buttons, rice, beads, pasta, confetti, sand, small toys, legos, googly eyes… the possibilities are endless! 4. Seal the bottle Make sure to secure the lid of the bottle, use a little bit of glue if necessary, to avoid leaking or spillage. Et voila, your bottle is ready to be explored! Remember: Make sure the bottle and all objects are clean to avoid any mould growing on your bottle. If your goal is to make a musical bottle, stay away from liquid ingredients. | 


